INTRODUCTION
For years, I had searched for a solution for maligned anterior teeth that did not involve many months/years of treatment for my patients. While crowded, rotated, or flared anterior teeth can sometimes be prepared for direct or indirect cosmetic restorations, the process is often aggressive and can involve destruction of perfectly good natural tooth structure.
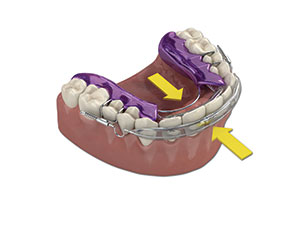
A few years ago, I discovered the Inman Aligner. This ingenious device was invented by Don Inman, CDT, of Coral Springs, Fla. It is a removable appliance that consists of an inner bow that pushes teeth labially and an outer bow that pulls teeth lingually (Figure 1). The appliance encompasses nickel titanium coil springs powering 2 opposing aligner bows to guide the teeth into their new positions. The Inman Aligner works quickly because the gentle forces are active over a very large range of movements. Most cases can be completed in 6 to 12 weeks, and sometimes one or 2 clear aligners are needed for refinement. It is useful only for the anterior 6 teeth that have crowding of 3.0 mm or less. I have used the Inman Aligner to align mandibular anterior teeth prior to restoration of opposing maxillary teeth to provide better functional contact. I have also used it for maxillary crowded teeth or to close spaces caused by flared teeth.
My patients have embraced the appliance because it can be removed according their lifestyle. It must be worn for 16 to 20 hours a day and removed for at least 4 hours a day. The relaxation of the bone upon removal allows for the absence of bone loss.
The appliance itself needs no adjustments as the total action is built in. Sometimes, I have added a small amount of composite resin on distal to the spring to tighten it when the bow has lost the “ping” due to tooth movement; however, this is rare. Interproximal reduction (IPR) with diamond-coated strips is all that is usually required. After the aligner is delivered, the patient is seen every 2 weeks to make slight adjustments to proximal contacts using the IPR technique. Sometimes, tooth contouring with discs or burs to reshape proximal surfaces is desired. Lifetime retention is recommended and can be accomplished with a bonded lingual wire or removable Essix retainers.
CASE REPORT
Diagnosis and Treatment Planning
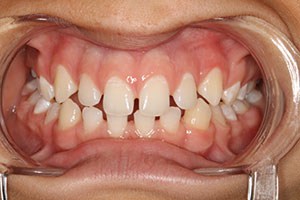
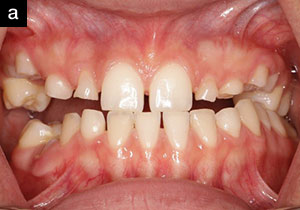
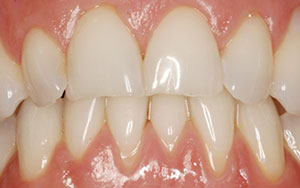
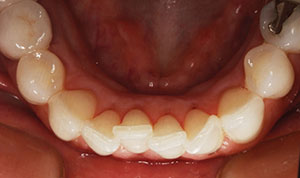
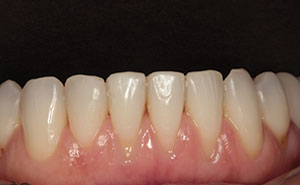
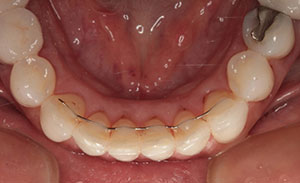
Our patient presented desiring porcelain veneers to align and restore her maxillary anterior teeth (Figure 2). Upon evaluation, it was obvious that part of the problem was the uneven incisal contact with the crowded mandibular anterior teeth. In Figure 3, you can see her contact position. The facial view in Figure 4 illustrates crowding of the mandibular 4 anterior teeth, uneven and worn incisal edges, and an uneven tissue line. The incisal view before treatment is shown in Figure 5. It was explained to the patient that the uneven contact with the mandibular teeth was, in part, the cause of wear of the incisal edges of her maxillary centrals. She was thrilled to hear that the mandibular teeth could be straightened in only a matter of weeks with a removable appliance. This would be done prior to the placement of veneers on her maxillary anterior teeth so that the occlusal contacts between the teeth in the anterior segment could be idealized for optimal restorative longevity.
 |
 |
| Figure 1. Diagram showing forces on Inman Aligner. | Figure 2. Pre-op photo of the patient’s anterior teeth. |
 |
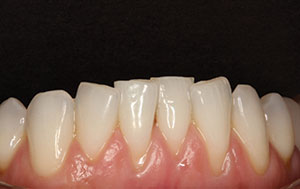 |
| Figure 3. Pre-op closed bite incisal view of the patient’s anterior teeth. | Figure 4. Pre-op close-up facial view of mandibular anterior teeth. |
 |
 |
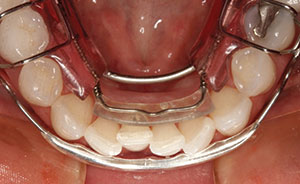
| Figure 5. Incisal view of mandibular anterior teeth before treatment. | Figure 6. Facial view of Inman Aligner at delivery. |
 |
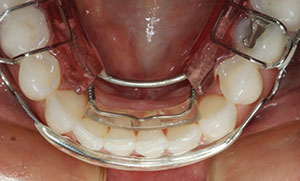 |
| Figure 7. Incisal view of Inman Aligner at delivery. | Figure 8. Incisal view after 8 weeks of treatment. |
 |
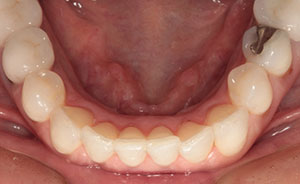 |
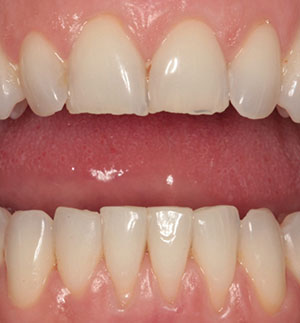
| Figure 9. Facial view of mandibular anterior teeth after alignment. | Figure 10. Incisal view of mandibular anterior teeth after alignment. |
 |
 |
| Figure 11. Close-up view after composite resin (NANOCERAM BRIGHT [DMP Dental]) was bonded to the incisal edges. | Figure 12. Bonded retainer wire in place. |
 |
 |
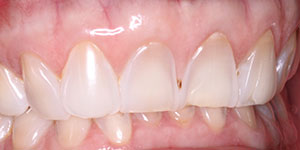
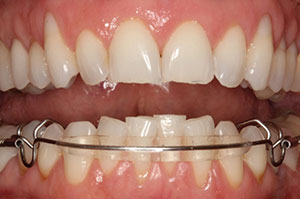
| Figure 13. Facial view of maxillary veneer (IPS e.max [Ivoclar Vivadent]) in place and mandibular incisors aligned and bonded. | Figure 14. New crystal clear wire-free labial bow (Inman Aligner). |
An accurate impression of her mandibular arch using an A-silicone impression material (Panasil [Kettenbach LP]) and an opposing alginate substitute impression (Salginat [Kettenbach LP]) was also taken along with an A-silicone occlusal registration (Futar [Kettenbach LP]). These were sent to the Inman Ortho Lab where models were poured and trimmed, then scanned and digitized. Using sophisticated software, the laboratory team digitally corrected the misaligned teeth and a report was created giving IPR location and amount, a tooth movement summary, and before and after screen shots. The corrected digital model was then sent to a 3-D printer where a corrected physical model was printed. The appliance was then designed and fabricated on the corrected physical model so that all the corrective forces were built into it. The Inman Aligner appliance was then returned to our office and was ready for delivery.
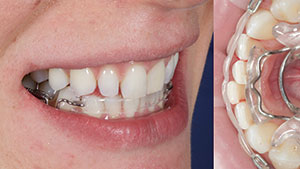
At the patient delivery appointment, the interproximal stripping (IPR) was accomplished and the appliance delivered. The patient was shown how to place and remove the appliance. She was instructed to leave it in place for at least 16 hours a day, and to remove it for at least 4 hours a day. The patient was to return in 2 weeks for an aligner check and adjustments to proximal contacts. The Inman Aligner is shown in place from the facial view at delivery in Figure 6 and from the lingual view in Figure 7.
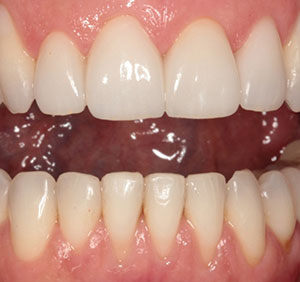
The patient returned in 2 weeks and slight additional IPR was done. This was repeated at 4 weeks and again after 4 more weeks. The alignment achieved in 8 weeks can be seen from the incisal view in Figure 8 with the Inman Aligner in place. Figure 9 shows the aligner removed from the facial view and the incisal view in Figure 10. Note the improvement in the tissue levels.
At the 8-week appointment, composite resin bonding using a nano-hybrid composite (NANOCERAM BRIGHT [DMP Dental]) at the incisal edges was accomplished (Figure 11) and a bonded lingual wire was attached for retention (Figure 12). The maxillary incisors (teeth Nos. 7 to 10) were prepared for porcelain veneers. Impressions were taken, sent to our restorative dental laboratory team, and lithium disilicate (IPS e.max [Ivoclar Vivadent]) veneers were fabricated and returned for delivery using an adhesive bonding technique with a light-cured resin cement (Choice 2 [BISCO Dental Products]). The completed prerestorative ortho/restorative-aesthetic interdisciplinary case can be seen in Figure 13.
CLOSING COMMENTS
By utilizing the Inman Aligner, the expectations for this patient’s desired aesthetics and improved function were more easily achieved. Using this conservative and affordable approach is a choice that your patients will also appreciate.
The appliance is regularly being improved, and recently a more aesthetic crystal clear wire-free labial bow has been introduced (Figure 14).
Dr. Nash maintains a private practice in Huntersville, NC, where he focuses on aesthetic and cosmetic dental treatment. An accredited Fellow in the American Academy of Cosmetic Dentistry and a Diplomate for the American Board of Dental Aesthetics, he lectures internationally on subjects in aesthetic dentistry and has authored chapters in 2 dental textbooks. He is co-founder of the Nash Institute for Dental Learning in Huntersville and is a consultant for numerous dental product manufacturers. He can be reached at (704) 895-7660, via email at rosswnashdds@aol.com, or at the website thenashinstitute.com.
Disclosure: Dr. Nash reports no disclosures.
Author’s Note
For CE opportunities, certification is voluntary in the United States but highly suggested and can be done online at inmanalignertraining.com and using the code “Inmanortho.” Dr. Nash also teaches a full-day Inman Aligner hands-on course at The Nash Institute, covering everything from case selection to final retention.
Also By Dr. Nash
Marrying Clinical Techniques and Teamwork
Minimally Invasive Preps for Thin Porcelain Veneers
Ceramic Crown for an Implant Abutment