


If you’re looking for tips on how to color characterize a 1-surface resin on tooth No. 19 while applying dentin and enamel shades, you may as well move on to the next article. My patients like them white and are mostly interested in getting out of my chair as quickly as possible with nothing more than a comfortable bite. Multicolor posterior resins just might be for the profession only.
What I will offer you is a down-and-dirty look at what I term the unwritten. By unwritten Irefer to the many items left unsaid when authors seek to share their approach to posterior composite placement, such as the strategizing of how 2 or 3 or 4 adjacent multisurface resins might be placed so as to avoid utter chaos. Define chaos as having to scramble to repair an open contact that has food trap written all over it and then running 20 minutes behind in your schedule (which may grow to 30 minutes as you try to adjust the mile-high occlusion you created). We’ve all been there!
Please note: If placement of composite resins is to be profitable and satisfying (as it should be), we had better learn to place a quadrant of resin restorations with the same aplomb that we enjoyed when placing a quadrant of amalgam restorations. Scheduling an hour to place a single MOD resin won’t stoke the retirement plan in today’s economy.
THE TOOLS
I honestly admit to you that posterior composite resins were low on my list of fun things to do for the very reasons alluded to above. Add to that the fear of sensitivity and resultant paranoia about making things worse rather than better, and you’ve begun to appreciate this authors former disdain for the entire process.
This outlook has changed in the past 2 years owing to a parade of new products that have helped to streamline the placement of composite restorations. The tools currently available to us prove that the dental industry has listened to our complaints, and in keeping with good old American enterprise, its players have tried to outdo each other in an effort to meet our needs. We win!
The components that have been improved upon are, in no particular order, the rubber dam (Yes! the rubber dam), bonding agents, matrix systems, composite itself, instruments used to place and manipulate it, and gizmos used to finish and polish composite resin. Even the handpieces available to us have turned it up a notch. As is typical in articles of this nature, I will be describing the tools that I’ve adopted, but I acknowledge that they are representative of their class, knowing full well that you may be using equally effective items in your own practice.
NANO-WIZARDRY
Unless you’ve been hiding under a rock, the term nanotechnology already should be familiar to you. To keep a long story very short, this term describes a method for producing a new class of composite resin based on particle sizes in the 20- to 75-nm range (1 micron [u] = 1000 nm; composites produced in the 1990s to 2000 were based upon filler sizes of 400 to 600 nm). At 20 nm we are approaching a composite build from the atom up. Using a blend of nanomers and nanomer clusters, 3M ESPE has brought us Filtek Supreme, an all-purpose anterior/posterior composite resin designed to possess the strength of a micro-hybrid with the polishability of a microfill. This is the resin system I use for the techniques described in this article, but as noted above, the individual clinician can make his or her own choices from a number of available products. While completion of long-term studies are always needed to bear out a manufacturers claims, the thought and testing that went into Filtek Supreme are compelling to this author.1-3
First and foremost, the ability to freehand sculpt a Filtek Supreme restoration plays into the quadrant strategy that we will soon discuss. Filtek Supreme will remain exactly where you placed it last. It will not slump. It will not cure via ambient light. A Filtek Supreme restoration can be brought to a near completion state with hand instruments before final cure. Finishing time is slashed. Unlike many of its micro-hybrid relatives, Filtek Supreme will yield nicely to an 8-fluted carbide finishing bur such as those found in Garrisons G-Block Finishing and Polishing system. And as advertised, it can be brought to a near microfill finish with rubber polishing instruments. Finally, for whatever reason (perhaps Filtek Supremes low polymerization shrinkage of 2%), the dreaded white line seems to have become a thing of the past. From a clinical perspective, it seems apparent that we’ve been granted freedoms only dreamed about in the days of amalgam.
THE MATRIX: REBANDED!
Actually, it’s more about the Wedge! If you caught my. All In the Contacts article in the September 2003 issue of Dentistry Today, you received an overview of the class II matrix business. In that article I referenced Garrison Dental Solutions. Wedge Wand as a nice accompaniment to its Composi-Tight Gold sectional matrix system. My assessment has since changed from to indispensable. The Wedge Wand might even be termed the missing link. When used as instructed by Garrison, the chances of inadequate contacts all but disappear.
S-T-R-E-T-C-H I-T
Do not skip this paragraph! I’ll beat a dead horse. The rubber dam will accelerate the whole process. It will contain flying amalgam debris, handle management of soft tissue, and assist you in moisture control. But not just any rubber dam will do. You need one that can get behind the tightest contact between the rubber dam (RD) clamp arm and the retromolar tissue without tearing; one that can be applied in seconds. The Hygenic Flexi-Dam (Colt/Whaledent) is that dam. Look for the purple dam in my photos. Couple this with Colt/Whaledents Hygenic Fiesta (color-coded) RD clamp kit and you’re home free.
SPECIAL AGENT: SELF-ETCH BOND
Self-etching/self-priming bonding agents have not only accelerated my resin placement, they’ve reduced the number of root canals performed in my practice. Post-operative pain phone calls have all but disappeared; the patient wins you win. My weapon of choice: Parkells Brush and Bond. I’m partial to the little purple micro brush that is part of the system, not to mention the utter speed of application.
REV IT UP
 |
| Figure 1. NSK Americas Ti Max 400 electric high-speed handpiece. |
If you haven’t had the pleasure of zipping through a quadrant of amalgam with an SS White 245 carbide bur and NSKs Ti Max 400 electric handpiece (under a Flexi-Dam of course), then dental nirvana awaits you. The Ti Maxs focused power (read: torque) will allow an operator to divest a patient of his or her 25-year-old quadrant of alloy in under 5 minutes without getting cramps in your fingers. This dream must be experienced to be appreciated (Figure 1).
The products noted above are the core players that I use. When coupled with a few extras and a strategy regarding how to start and how to finish, they will empower you to become a master at posterior resin placement. Lets dig in.
PRELIMINARIES
Before you pick up a handpiece, observe the occlusal form of the amalgams you will be replacing. Are they excessively worn and part of an occlusal landscape reminiscent of the tundra (read: flat), or are they relatively well-preserved amidst a well-defined range of cusps. Throw some articulating paper in there for good measure to see where the primary supporting points remain. This preliminary determination will guide you as to which method you might use to reconstruct the occlusal surfaces. It makes no sense to sculpt beautiful anatomy in an excessively worn quadrant and then spend 20 minutes leveling it back to tundra status.
Next, decide which tooth will be the anchor tooth, that is, the one that will be reconstructed first, around and against which the rest will be reconstructed. Typically, this will be a 3- to 4-surface restoration found in the middle of the pack.
 |
| Figure 2. Hole punch in FlexiDam with 1/4 inch slit. |
Once your patient has been anesthetized, place the Flexi-Dam, preferably with the retaining clamp one tooth distal to the last tooth in the quadrant that you plan on restoring. This isn’t always possible, but sectional matrices can be employed even in the presence of a rubber dam clamp, as will be demonstrated. We use the slit technique, which employs a single hole punch from which is extended a scissors slit usually one-quarter inch in length (Figure 2). This usually allows the dam to be stretched one tooth mesial to the most forward tooth to be restored. This method, while not as moisture-proof as punching each tooth separately, is very fast and will solve most issues requiring a rubber dam. Now you are free to remove the old alloy quickly, knowing that your patient won’t be ingesting it for lunch.
What follows is my typical approach for restoring a quadrant with 2 variants. In the first case, occlusal anatomy is hand sculpted (BAC = bite adjusted after curing). In the second case, occlusal form is determined via the patient occluding into uncured composite prior to light curing (BBC = bite adjusted before curing). Please note that in order to make a point with the best photo possible, you may notice other quadrant shots mixed into the sequence.
CASE 1: THE CLASSIC MO, MOD, DO
 |
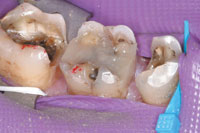
| Figure 3. Evaluating the occlusion of a deserving quadrant before preparation. |
Of course the patient needed crowns, but the cost of an opposing bridge dictated that composite restorations be used to restore this lower right quadrant. Although this quadrant might have been restored more easily with the BBC method, it was done via the BAC method. As you can see in Figure 3, articulating paper (Accufilm II, double-sided, by Parkell) has been used to provide a heads-up on where the teeth occlude. Tooth No. 30 was chosen as the anchor tooth from which to begin the restoration of the quadrant.
 |
| Figure 4. Quadrant isolated, divested of amalgam, and ready to be restored. |
In Figure 4, the Hygenic Flexi-Dam has been placed and secured mesially with a Wedge Wand. The alloy has been cleared, and teeth are ready for a 5-second phosphoric acid etch employed to freshen up the nonprepared bonding surfaces. This is typically followed with an application of Parkells Brush and Bond prior to composite placement.
 |
| Figure 5. The anchor tooth No. 30 is restored first using an Automatrix to assist in proximal wall formation. |
In Figure 5, a Dentsply Automatrix has been employed to allow for buildup of the gingival boxes with an initial layer of flowable composite (Synergy Flow, Colt/Whaledent), followed by the first application of Filtek Supreme.
 |
 |
| Figure 6. A second layer of Filtek Supreme is applied. | Figure 7. Full anatomic buildup of tooth No. 30. |
 |
 |
| Figure 8. Contouring by dragging out composite from central fossa against existing cusp. | Figure 9. Sharpening up the anatomy with a Garrison TN004 composite instrument. |
In Figure 6, a second layer of Filtek Supreme has been freehanded onto the preparation and cured. Figure 7 demonstrates the full anatomic buildup of tooth No. 30 following angled instrument carving (AIC). AIC resin placement relies upon the remaining cuspal anatomy to guide resin shaping using the existing cusp, against which the plastic instrument is dragged beginning in the central fossa groove (Figure 8; instrument shown is Hu Friedy XTS Goldstein Flexithin Composite Instruments 1DE). Fine tuning anatomy can be accomplished easily with Garrisons TN004 extra thin blades, shown in Figure 9. Typically, 2 applications of Filtek Supreme will restore to full contour without risk of uncured resin or excessive shrinkage.
 |
| Figure 10. Using a Hu Friedy XTS instrument to roll the marginal ridge toward center, creating a more anatomic embrasure. |
Marginal ridge formation is accomplished easily by setting the tip of the XTS instrument between the matrix band and composite, and rolling the leading edge composite back toward the center of the tooth to form an embrasure. Contacts between adjacent teeth occur 1 to 2 mm below the crest of the embrasure, not at the apex of the marginal ridge acommon misinterpretation (Figure 10).
 |
 |
| Figure 11. Garrison matrix in place on tooth No. 29 ready to build against anchor tooth. | Figure 12. Restoring tooth No. 31 with Garrison section matrix and Addent Tri Max. |
 |
Figure 13. Completed quadrant. |
Once the anchor tooth (No. 30) has been completed, it is now an easy task to situate a Composi-Tight Gold matrix and retainer on the distal of tooth No. 29 and restore it in kind (Figure 11). As shown in Figure 12, an additional Composi-Tight Gold matrix can be placed on the mesial of tooth No. 31 and secured by a Wedge Wand even in the presence of a rubber dam clamp. Shown is Addents Tri Max matrix forming device used to aid in establishing a solid contact in the absence of a retainer/separator ring. Figure 13 demonstrates the completed quadrant.
TIPS ON PLACING THE SECTIONAL MATRIX
(1) Precontour the matrix in your fingers so that it will wrap around the tooth rather than hanging up on the gingivae.
(2) Plan on opening the contacts slightly and separating the boxs gingival margin 0.5 to 1 mm from the adjacent tooth for easier matrix and wedge placement.
(3) When placing the Wedge Wand, hold the top edge of the matrix with an index finger to keep it from dislodging occlusally when the wedge is placed.
(4) Attempt to place the wedge to the hub for best separation.
(5) Don’t forget to burnish the matrix in its contact area against the adjacent contact.
CASE 2: FUNCTIONAL OCCLUSAL FORMATION (FOF)
 |
 |
| Figure 14. Another deserving quadrant. | Figure 15. Mesial wall of tooth No. 31 reconstructed via freehand placement and shaping of Filtek Supreme. |
 |
Figure 16. Distal wall of tooth No. 30 placed against anchor tooth No. 31 with Garrison matrix. Note placement of retainer ring tynes between wedge and matrix. |
Now for the ultimate time saver: note the deserving trio in Figure 14. Please follow the sequence. In Figure 15, following alloy removal and leveling of a fractured DL cusp on tooth No. 31, the mesial wall of tooth No. 31 has been reconstructed, freehand, with Filtek Supreme and a Garrison TN004 composite instrument. Tooth No. 31 has been chosen as the anchor tooth. Composite placement was preceded by phosphoric acid 5-second prep and application of Parkells Brush and Bond. Note in Figure 16 that a Garrison matrix has been placed on the distal of tooth No. 30 with subsequent construction of the distal wall of that same tooth. Note how the Wedge Wand is inserted to its hub and that the tynes of the Composi-Tight Gold retaining ring are positioned between the wedge and the sectional matrix band. Had the box been wider, placing the tynes outside of the wedge (as opposed to inside) would have made it less likely for the matrix to collapse into the box preparation.
 |
| Figure 17. Dam removed with wedge and matrix band left in place in preparation for establishing occlusion prior to final curing. |
In Figure 17 the rubber dam has been removed, and the wedge and matrix left in place with the matrix leveled to estimated occlusal height. Leaving these in place prevents bleeding that would interfere with the bonding process. Additionally, a base layer of flowable resin (Synergy Flow, Colt/Whaledent) has been applied to the cavity surface well below final contour. At this point, occlusion is checked for high spots and adjusted on the pre-formed proximal walls of teeth Nos. 30 and 31. The teeth are isolated using cotton rolls during this point in the reconstruction.
 |
 |
| Figures 18 and 19. Closed view of occlusal formation. (Imagine having to cut in that occlusion after having overbuilt and cured the surface with composite.) |
In Figures 18 and 19 the patient has been instructed to occlude naturally into bulk Filtek Supreme that has been placed in the remaining occlusal voids of teeth Nos. 30 and 31. This process is repeated several times. Each time, excess resin is removed while sculpting the new occlusal surfaces around the imprint of the opposing cusps. Once satisfied that occlusal form matches the opposing dentition, the remaining uncured composite is light cured for final set. Following minor spot adjustments and contour corrections with Garrisons G-Block Finishing and Polishing system and a No. 12 disposable scalpel blade, the restoration is polished with rubber cups and points also found in the Garrison system.
 |
| Figure 20. Completed restorations: not pretty, but functional. |
In Figure 20 the completed Filtek Supreme restorations can be observed after a final coating with Biscos BisCover. While departing from ideal anatomy, teeth Nos. 30 and 31 have been restored in a logical sequence that ensured sound contacts and occlusal harmony, minus the frustration associated with excessive occlusal adjustment.
It should be noted that maximum care is taken to keep the working areas dry during the “smush bite” process. Prebonding and application of base composite under the Flexi-Dam allows this author to be comfortable with adding the final occlusal layer in the manner described.
CLOSING ARGUMENT
Todays restorative tools allow the skilled operator to place direct posterior restorations that can rival or even exceed their indirect counterparts. Mastering the materials and techniques is the precondition for getting there.
Take away message: The astute operator should employ a modicum of composite strategy and strive to take advantage of todays nanotechnology, self-etching bonding agents, and matrix systems to produce near finished restorations prior to picking up the curing light. In doing so, increased productivity and job satisfaction will replace any prior frustrations formerly associated with the placement of posterior composite restorations.
References
1. Duke SE. Has dentistry moved into the nanotechnology era? Compend Contin Educ Dent. 2003;24(5):380-382.
2. Mitra SB, Wu D, Holmes BN. An application of nanotechnology in advanced dental materials. J Am Dent Assoc. 2003;134(10):1382-1390.
3. 3M ESPE Filtek Supreme Universal Restorative: Technical Product Profile. St. Paul, Minn: 3M ESPE; 2002:44. PDF available at 3m.com/intl/kr/medi/medi5/pdf/Filtek%20Supreme.pdf.
Dr. Goldstein practices general dentistry in Wolcott, Conn. He lectures and writes extensively concerning cosmetics and the integration of digital photography into the dental practice. A contributing editor to Dentistry Today, he has also authored numerous articles for Compendium, CERP, and other international dental publications. He can be contacted at martyg924@cox.net. His current speaking schedule can be found at dhapc.com, while information on his Comfort Zone Cosmetics hands-on seminars is posted at smilevision.net


